Friday, November 11, 2016

One Pot Cheesy Taco Pasta


I have already expressed my love for casseroles.  Is there any doubt I would also love one pot dinners?  I do have a couple of these I make on a regular basis, but I thought I would try something new.  It was Tuesday, after all, and around here that means TACOS!!  So, I tried this recipe.  It did not disappoint.

Here is the original link:
Cheesy One Pot Taco Pasta

Seeing that I live in Canada, sometimes the conversions can throw me for a little loop.  For example, she said to use a one ounce packet of taco seasoning.  My packet was 35 grams, and the conversion should have been closer to 28 grams.  Whatever.  I threw the whole packet in there.  Also, I only used the 1 lb of ground beef the recipe called for.  I felt it could have had more beef in it, so next time I am upping that to 1.5 lbs of ground beef.  Below, is how I made it (or what I figure works best) - with my conversions.

Cheesy One Pot Taco Pasta

  • 1.5 lbs lean ground beef
  • 1/2 tspn salt
  • 1 packet Old ElPaso taco seasoning (I used mild)
  • 2.5 cups water
  • 1 small jar mild salsa
  • 4 cups uncooked rotini pasta
  • 1.5 cups cheddar cheese
Directions:
  1. Cook ground beef and season with salt.  Drain grease.
  2. Add taco seasoning, stirring until combined.
  3. Add water, salsa, noodles, and bring to a boil over medium high heat.
  4. Stir, cover, and reduce heat to a simmer.
  5. Cook until pasta is tender.  This took me closer to 30 minutes.
  6. Turn off heat, add cheese and stir until melted.
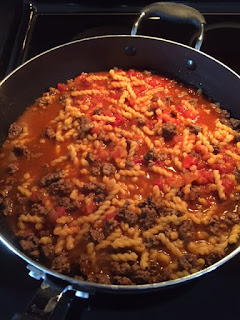
Here are the ingredients I used.  I really appreciated that this recipe had so few ingredients.  I love that!  Yes, I did use that whole jar of salsa.  The original recipe called for a cup.  I misread it and added a jar.  I would do it again next time too.  It seemed to need the moisture.  I also realize those noodles I used are smaller than actual rotini, but we liked it.

After my beef was cooked, and I added in the pasta, I felt like 2 cups of water wasn't enough.  It turned out I was right.  It could be because I essentially used more pasta because the 8 ounce conversion of rotini worked out to be 4 cups.  This pasta is smaller, so I knew 4 cups would probably equate to a bit more than the 8 ounces, but I would rather make too much than not enough.  I ended up adding more water to my mixture about halfway through cooking.  Don`t worry - all that moisture gets absorbed by the noodles!  It did take me longer to cook than I expected.  After 15 minutes, the noodles were still not fully cooked, so I just kept cooking until they were.

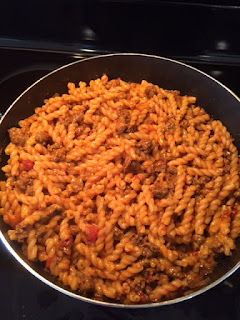
Here it is all done!  It`s kind of like a Hamburger Helper concoction.  See what I mean about the ground beef?  More was required.  Most likely due to my extra noodles.

I took a handful of whole wheat Tostitos and crunched them up on top of each serving.  It was really good.  I knew my kids wouldn't like guacamole, or anything too spicy and I knew I couldn't go wrong with tortillas.

This recipe got a thumbs up from both my boys and my husband.  The kids are the hard ones to please, but surprisingly, even the little one ate it with no complaints.  It especially helped that I served it with tortilla chips.  Pinner Approved!

What to search for on Pinterest: One Pot Cheesy Taco Pasta, or see link above
Pros: Few dishes, few ingredients, fast, tastes great
Cons: NONE
Would I make this again? YES

Sunday, November 6, 2016

Pumpkin Chocolate Chip Muffins


What to do with left over pumpkin? I had some from another recipe I was trying out, so I decided to go to my tried and true pumpkin muffin recipe.  I really like this recipe because I have healthified it somewhat and it doesn't take a whole can of pumpkin, so it's perfect for using up those leftovers.

Here is my recipe:

Pumpkin Chocolate Chip Muffins

  • 1 cup of coconut sugar
  • 1/4 cup of melted coconut oil
  • 2 eggs lightly beaten
  • 3/4 - 1 cup of canned pure pumpkin
  • 1/4 cup water or milk
  • 1 cup unbleached flour
  • 1/2 cup whole wheat flour
  • 1 tspn baking soda
  • 1/2 tspn salt
  • 1/4 tspn ground cloves
  • 1/2 tspn cinnamon
  • 1/4 tspn ground nutmeg
  • 3/4 cup of milk chocolate chips
Directions:
1. Preheat oven to 350 degrees.  Line muffin pan with paper liners.
2. Combine sugar, oil, eggs, and water (or milk).  Set aside.
3. Mix together flours, baking soda, salt, and spices. 
4. Add wet mixture to dry just until combined. Stir in chocolate chips.
5. Bake for 20-25 minutes until toothpick comes out clean.
6. Let sit in tin for 5 minutes, then transfer to a cooling rack.

I use coconut sugar for most of my regular baking. That is why my sugar, oil and egg mixture is pretty dark.   I only used 3/4 of a cup of coconut sugar, and I don't notice a difference in flavour. 


After you have that combined, you just need to add your pumpkin and water or milk.  This day, I simply used water.

Once you combine your wet and dry ingredients, the batter does seem a little thick.  Not to worry, it all works out in the end.  Only combine until all the flour is absorbed into the mixture.  Then stir in your chocolate chips. 

Here are my muffins before going into the oven. Not too pretty, I know.


I baked mine for exactly 22 minutes.  20 minutes is probably enough for most ovens.  Mine always seems to need that extra couple minutes.  Do not over bake because they will dry out.

These muffins aren't the prettiest muffins, but they are a healthier version without skimping on flavour!  We love these muffins around here and I do make them frequently.


Friday, October 28, 2016

Million Dollar Casserole: Recipe Review

Easy, make ahead supper!

This is a recipe that I make when I am desperate to get the ENTIRE family to eat one meal.  You know, mainly so the little one isn't scavenging the fridge and pantry an hour after supper claiming he is starving because he wouldn't eat his supper.  I digress.  Initially, this was intended to be a freezer meal.  One of those recipes you can make huge batches up and freeze and have lovely dinners for the next 8 months without any effort.  I have never gotten that far.  I make it one night and maybe have a bit of leftovers the next day.

I have seen several variations of this recipe around Pinterest, including Million Dollar Spaghetti.  This recipe uses penne pasta.  One day, I had no penne left, so I used shells.  My youngest son started shrieking and thanking me because he LOVES the shells and thought I did it to be extra nice.  Fat chance.  Use whatever pasta you want - it will all taste good.

Here is the original recipe I used:
Million Dollar Casserole
As usual, I have tweaked it and come up with what works perfectly.  I use more beef for one.  One pound doesn't seem like near enough.  I upped it to two and that seems to work better.  I also don't use the butter.  I haven't from day one because I honestly didn't see the need.  There is enough fat with all the cream cheese and cheese that it just didn't seem necessary.  Anyway, my tweaked version is below.

Million Dollar Casserole

  • 2 lbs lean ground beef
  • 640 ml jar of spaghetti/pasta sauce
  • 1/4 cup cream cheese (works better if it is room temperature)
  • 1/4 cup sour cream
  • 1 cup ricotta cheese
  • 5 cups of penne pasta
  • 1/2 - 1 cup cheddar cheese
  1. Cook ground beef and drain the fat.  While the beef is cooking, cook the pasta.  You may want to use more than the 5 cups, but that is what I used with shells. Drain the pasta.
  2. Combine the cream cheese, sour cream and ricotta in a small bowl.
  3. In a 9x13 glass pan, spread out half the pasta.
  4. Top the pasta with your cream cheese mixture.  Spread it out as best you can, but don't worry about covering every little piece.
  5. Top the cream cheese mixture with the rest of the pasta.
  6. Top the pasta with the beef.
  7. Top the beef with your jar of pasta sauce and spread evenly around.
  8. Sprinkle the cheese on the top.  I like to have mine covered completely.
  9. Bake at 350 degrees for 45 minutes.
When I say I like to have mine covered in cheese, that is all but the strip my 7 year old eats, because he doesn't like his topped with cheese.  See what I'm dealing with here?

There really aren't THAT many ingredients to this in addition to the beef and pasta.  The only one I don't typically have on hand is the ricotta.

It is fairly simple to throw together once your beef and pasta is cooked.

See how early it was when I started this? I love recipes like this.  You get all your "precooking" and clean up done, and all you have to do is throw it in the oven when the time comes.  Everything is done before the kids get home from school.

From there, you just assemble everything.  One thing I want to mention is that it is important to get a good "base" of pasta.  You want to have something for your cream cheese mixture to sit on.

There she is.  All thrown together, with one strip void of cheese.  

Viola! The final product ready to eat.  I guess I should have thought this through and cheesed up the whole thing.  Nah.  That's what my blog is about - real life.  Everything may not be picture perfect, but it's all true, and it's a real reviews for what works for my family.

Pinner Approved!

What to search for on Pinterest: Million Dollar Casserole (or see link above)
Pros: make it in advance, easy and cheesy, most ingredients are on hand
Cons: lots of dishes to wash (seriously, I HATE that)
Will I make this recipe again: You bet!

Monday, October 24, 2016

Halloween Recipe Review: Easy Mummy Cupcakes


This isn't so much of a recipe review as it is some tips and words of encouragement.  I am by no means a cake decorator.  I am just an average mom who likes baking and making treats for her kids.  So, while something like this LOOKS really simple, I know for me, it sure isn't going to come out looking like the picture.  I think that is where most of us "pinners" fit in.  We love the look of all the beautiful foods and treats, but really are unsure of whether or not it is within our capabilities.  I am basically here to say if I can do it, you can do it!

Honestly, do you want to know my secret to delicious cupcakes?  Every time I make these, I am complimented on how good they are.  They are light and fluffy, yet still chocolaty.  I have tried other recipes.  You know, ones that claim to be the "best ever chocolate cake recipe", and I always come back to this.  Here's my secret:

I kid you not.  Make it exactly how it says on the package and you will not be disappointed.

I wanted to send these in to my son's class for a Halloween treat.  I also know the teacher would appreciate my gesture a lot more if I didn't send in enormous iced cupcakes.  You know what sugar does to kids.  This box makes A LOT of mini cupcakes.  I was tired of them after about 48 and I knew I had enough, so I made 5 large cupcakes with the rest.  That's a lot of cupcakes!

I usually have such a hard time finding candy eyeballs at Halloween.  This year, I found a vial of them at the Dollar Tree.  I contemplated getting 2, then like an idiot thought, NAH, I WON'T NEED THESE.  Wrong.  I ran out towards the end.  Guess what happened when I went back to get more.  You guessed it!  All gone.  Lesson learned - spend the extra $1.25 even if you think you won't need it.  Don't be a cheapskate.

I also cheated and didn't make the icing.  Homemade icing is so much better, but I thought it would just be easier to get a really white icing if I bought it.  As you can see below, the icing I bought didn't turn out to be white.

I began by "gluing" on the eyeballs with icing.  Give yourself enough room so you can fit some icing bandages on the forehead. Doesn't he look sad without his bandages?

 I just used a flat tipped icing end, and away I went.  You kind of have to get into a rhythm when you are doing these.  Do a couple passes on the forehead, and then come down around one side of the eyes.  Do another pass or two on the forehead and come down the other side of the eyes.  After that, you just fill in the bottom, back and forth.  Be careful not to cover up the eyeballs when you are coming down the side.  I did that several times.  Remember? I'm no expert. Here is one close up, so you can see all the imperfections.

They look much better in a group! But, as you can plainly see, some look better than others.  You can see my blunder of covering up the eyes on a couple of them.


Also, it is best to keep these chilled.  As the icing starts to warm, it starts to lose its "bandage" look because it all just kind of blends in.

I don't think they turned out too badly.  No, they don't look as good as the pictures on Pinterest.  But, this is how mine looked.  They still look like mummies, so mission accomplished.  They were fairly easy to make.  I do believe even someone who has never iced a cupcake could pull these off. 

What to look up on Pinterest: Easy mummy cupcakes
Pros: This is a really easy "recipe" to throw together if you used a box cake mix, and premade icing, you can make these large cupcakes or mini cupcakes
Cons: these do still take a lot of time to make once you consider all that icing you have to do - especially if you aren't an expert at icing (like me)
Would I make these again? I think I would.  In the end, they are fairly easy to make and you do get a really spooky Halloween cupcake out of it!

Follow my blog with Bloglovin

Thursday, October 20, 2016

Recipe Review: Coconut Oatmeal Cookies


I tried these on a whim.  Basically, I had accidentally bought a bag of sweetened coconut, rather than the unsweetened I needed for a different recipe, and I needed to use it up.  Also, it doesn't hurt to try something that isn't chocolate every once in a while.

I wanted to say I followed the recipe exactly, and I almost did.  Sadly, when I went to make them, I realized I only had about half a cup of white sugar left.  The recipe called for 1 cup, so I just substituted that extra half cup with more brown sugar.  I don't think it made much of a difference, so I am just going to post the recipe exactly as it was written. Also, here is the original link:
Coconut Oatmeal Cookies

Coconut Oatmeal Cookies

  • 1 cup butter
  • 1 cup sugar
  • 1 cup brown sugar
  • 2 eggs
  • 2 tsp. vanilla
  • 1 tsp. salt
  • 1 tsp. baking soda
  • 1 tsp. baking powder
  • 2 1/2 cups flour
  • 2 cups oatmeal
  • 1 cup coconut
  1. Cream together butter, sugars, eggs and vanilla.
  2. Mix all dry ingredients together in a separate bowl.
  3. Add dry ingredients to wet ingredients and mix well.
  4. Spoon onto baking sheet. Bake at 350 for 8-10 minutes.
I actually ended up baking these for about 11 minutes.  I don't think my oven runs as hot as others.  After 11 minutes, they were a nice light brown on the bottom, but definitely not ready to take off the pan.  Let them sit for at least 5 minutes and then transfer them to a cooling rack.
 
Here is my process.  Sometimes, it's nice to see pictures of how another person's process goes just so know you are on the right track.
 
Here's where I thought I may have fallen off that track.  I was simply creaming the butter and the sugar, and I couldn't get the chunks out of the butter.  Maybe it was too cold when I put it in there.  I thought it was room temperature, but maybe the room was cold ;).  Anyway, I am here to tell you not to worry if this happens to you.  It made NO difference.  All was well.
 
 
Here is the dough with everything added.  It's just one big chunky mess anyway. I mean that in a good way.
 
 
This is the point I almost always second guess myself.......the size to make the cookies.  This recipe ended up making 36 (well 35 if I am being honest) good sized cookies.  I fit twelve to a pan.  I didn't flatten them or anything of the sort. 

 
I think they came out great!
 
I took a couple out for each kid for an after school snack.  No, these aren't the healthiest, but nice for a treat.  I always know if my baking is a hit if I find myself yelling at my boys to keep their little paws out of the cookie tin.  Yes, I did hear myself ever so kindly telling them to stay out of the tin.  I would say these have definitely passed my pintest!
 
 
What to search for on Pinterest: Coconut Oatmeal Cookies (or see link above).
Pros: Fairly quick to make, delicious, not your regular chocolate chip cookie, easy
Cons: Not your regular chocolate chip cookie (I know. I am contradicting myself.)
Would I make these again: Yes, however, I would probably add chocolate chips.  Don't they just make EVERYTHING better?


Tuesday, October 18, 2016

Review: 300 Reps for Perfect Abs


I have seen this floating around Pinterest a lot.  I am not entirely sure who the originator of it is, but here is where I saw it:

http://www.youmefit.com/how-to-300-reps-abs/

This sight gives great tutorials of all the different exercises - or at least it points you in the right direction.

Now, I like to think of myself as somewhat fit.  I work out about 5 times a week.  I am by no means a fit queen flaunting my abs (or lack thereof) all over Instagram, but I can hold my own - whatever that means.

Anyway, the first time I did this, I was only able to do the first of the three parts.  Something came up with one of my boys - I believe it was some sort of hygiene issue which required my immediate attention.  Let's just say I wasn't too upset and I didn't end up coming back to finish the remaining parts.  Why?  I could BLOODY WELL feel it after just the first part.  I must admit, I am slightly embarrassed.  I was even a bit sore the next day.

Here is my opinion of this ab workout: I have made this part of my regular workout regime - all three parts of it.  I may stray from it for awhile here and there to tackle something else, because our bodies do get used to routine .  However, I do come back to it.  I think it is a very effective core workout.  Will you develop abs after a week?  Unlikely.  That's the thing I really hate about all the different ab routines that say things like "Get rid of that belly pooch with these effective moves!"  Sorry, that isn't going to happen.  Any trainer will tell you that you can have abs of steel, but if you have fat on top of those abs, those suckers aren't going to show up.  However, this is a really effective routine for tightening your core.  Give it a try.  Don`t feel like you have to do all 3 parts either.  Ideally, yes.  But, if you are crunched for time, or physically cannot do it, just start with 1 part.  You will be able to do all 3 in no time!

Friday, October 14, 2016

Recipe Review: Easy Peasy Cheesy Chicken and Rice Bake


It's true.  I'm all about the easy recipes.  There's also something to be said for those casserole type recipes that you can make in advance, have all the clean up done, and then just throw it in the oven when the time comes.  This recipe is everything.  My kids LOVE it.  I mean both of them.  Not just one.  Both love it at the same time. Do you know what a miracle that is?  Hence, this recipe is on a regular cycle around here.

Now, here is my tip to get your kids to love this recipe even more.  Serve it with whole wheat tortilla chips (or whatever kind you happen to eat).  They will eat it like a dip and love every bite.  You can also put this in a wrap if you are so inclined.

The original recipe has 883k pins on Pinterest! Here is the link to the original recipe:
Cheesy Chicken and Rice Bake

I will rewrite the way I make it below.  I have made this so much, there are a few things that I have learned.  For example, the recipe calls for only 2 chicken breasts.  I use 4.  We like chicken around here.  Also, it calls for 1 cup of sour cream and half cup of salsa.  I do even amounts, so about 3/4 cup of each.  I also don't use the Chilis, because, well, then my kids WOULD NOT eat it.  I also don't use cilantro because I hate it.

Cheesy Chicken and Rice Bake

  • 4 chicken breasts cubed and cooked
  • 4 cups of cooked brown rice
  • 1 small can of corn
  • 1 can black beans, drained and rinsed
  • 3/4 cup of sour cream or Greek yogurt
  • 3/4 cup of salsa
  • 1.5 cups of shredded cheddar cheese

Mix everything together in a large bowl, and spread into a 9x13 casserole dish.  Bake for around 30 minutes at 350 degrees or until heated through.

So, yes, you have to cook the chicken first and you have to cook the rice first.  I never have that sitting waiting in my fridge, because if I did, HELLO? That's called leftovers and there wouldn't be a need for me to cook that night.  So, I wouldn't exactly say this is a QUICK recipe.  The beauty of it is, you can get it all done in advance.  This does make a fairly large batch, so we usually have at least a little for leftovers the next day.  Either the kids get to take it for lunch, or my husband does.  It depends on which I am happier with ;).

Here's the process in pictures:

Yes, that does say Peaches and Cream corn.  Slightly sweeter than regular corn.  I was all out of the other stuff, and no one around here seemed to notice, or if they did, they knew better than to complain.  This recipe is pretty forgiving.  In fact, once I was substituted the sour cream with Greek yogurt which is completely fine.  I guess I wasn't paying attention, because when I served it, I realized I used vanilla flavored Greek yogurt.  True story.  I`m not going to lie and say it was delicious.  It was weird, but oddly enough, everyone still ate it.
 

That's a lot of chicken now that I see this!  It's ok. We need the protein.

But, seriously, it doesn't get any easier than this.  No spices to fiddle with.  Just throw it all in a big bowl and stir until you think it looks good.
 
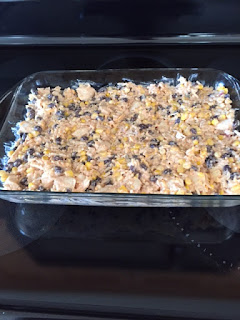
This is precooked.  Technically, you probably could eat it like this since the chicken and rice are already cooked.  I'm not sure that you would want to though.  I didn't get a picture of it after.  I kind of forgot, and by the time I put it on the table the kids were already digging in.  Not so attractive.


What to search for on Pinterest: Cheesy Chicken and Rice Bake (or see link above)
Pros: delicious, make it in advance, ingredients most people have on hand, easy
Cons: there is some "pre-cooking" to be done
Would I make this recipe again? Yes! It's on a weekly rotation around here.

Tuesday, October 11, 2016

Review: Lemon Zucchini Loaf


This is going to be my last zucchini post for awhile.  I promise.  I have now officially used it all up.  This time, I wanted something with no chocolate or cinnamon.  I just wanted something a little different.  I went for a zucchini lemon loaf.  Exciting, right?

I made the mistake of trying this recipe on a day my boys were home from school.  Luckily, it was also the day of our first snowfall, so they were playing outside.  Every ingredient I threw into the bowl, I did a silent prayer of thanks.  The problem is, this loaf called for the zest of a lemon.  Then, I compounded that problem by doubling the recipe (remember, I had that enormous zucchini to get rid of). So, it required the zest of two lemons, along with the juice of two lemons.  So, there was a lot of this:


Wouldn't you know it, I was just combining the wet and dry ingredients, and my 7 year old came in crying that his brother hit him in the head with a snowball.  Grrrr.  I was so close to getting it done!  After some consoling, I was able to get the loaves into the oven.

The recipe I went with had 160k pins, so I figured it had to be a good one! Here is the original link to the recipe:
Lemon Zucchini Loaf

I only altered it slightly.  This time, I actually used white sugar, rather than my coconut sugar because I wanted it to be a light, pretty colour.  I know that's ridiculous.  Also, I never have buttermilk on hand, and refuse to buy one because it just gets thrown out.  I made my own with one cup of milk mixed with one tablespoon of lemon juice and let it sit for 10 minutes.  I also left out the glaze.  Here is the recipe I used (x2). 

Lemon Zucchini Loaf

2 cups unbleached all-purpose flour
2 teaspoons baking powder
1/2 teaspoon salt
2 eggs
1/2 cup melted coconut oil
2/3 cup sugar
1/2 cup buttermilk substitute (see above)
Juice of one lemon
Zest of one lemon
1.5 cups of grated zucchini

In a large bowl, blend flour, baking powder, and salt.

In a medium bowl, beat the eggs, add oil, sugar, and blend well.  Add buttermilk (or substitute), lemon juice, lemon zest, and blend well.  Fold in Zucchini.

Add wet ingredients to dry and mix just until blended.

Pour batter into a 9x5 loaf pan, and bake at 350 degrees for 45 minutes.  Cool in pan for 5 minutes and turn on to wire rack to cool completely.

So, I took mine out after 45 minutes and they looked a little on the dark side.  I could have just used coconut sugar!  The good news is, the flavour was fabulous.  This loaf was moist and lemony and I loved it.  However, my boys claimed they liked it, but it never got eaten.  I kept finding half eaten pieces. Usually, my baking is gone within 24 hours.  There was still some left after 3 days.  That made my husband happy, because he loved it too and was thrilled to take the rest of it to work to have with his coffee.  I guess my kids would rather the chocolaty stuff!  Here is my finished product.  Don't laugh at the colour.  I didn't really BURN them.  They just look tanned.

What to search for on Pinterest: Lemon Zucchini Loaf (or see link above for original recipe)
Pros: Moist, lemony, delicious
Cons: Lemon zest is a painful process, not to make when you are in a hurry
Would I make this again? Unlikely, but not because it wasn't delicious.  This recipe was fabulous.  It's just that when I bake, I bake for my kids and not myself.  I don't need the added calories. It clearly wasn't a favorite of theirs, but now I know they don't appreciate lemon like we do.  Live and learn!

Friday, October 7, 2016

Practical Uses for Perler Beads


If your kids are anything like mine, they get a real kick out of creating perler bead designs.  Sure, sometimes they sit there, piling up, waiting for me to iron them.  Sometimes, they will accidentally get knocked over and beads will get strewn everywhere.  I digress.  I love my kids crafts, I really do, but sometimes you just want to scream, "Stop the madness!!"  How many different colors and variations of a perler bead cupcake do I need?  One.  The answer is one. 

So, I started thinking.  Surely, there has to be something I can do with these things?  Anything?  I started looking up perler bead designs my boys could make that would actually be relevant to them.  For example, I found so many for Minecraft.  These are perfect considering the pixelated nature of the whole Minecraft phenomenon.  These ones tend to be my favorite (please see below for what to look up on Pinterest).  I also looked up Pokémon and found a ton of designs for that.  So, now that I had found some designs that are completely relevant to my boys, I needed to figure out what to use them for.  I had initially made myself a little keychain out of one of the cupcakes.  Alas, it wasn't to be.  My keys are thrown around too much and that little cupcake ended up breaking.  Shucks.  I had to throw it out.  Not to worry, I have about 37 more waiting to replace it.

Here are some of the finished Minecraft perler bead designs my boys have done.  Notice some of them have holes in them?  More on that later.


I thought that these would be useful as bag tags, or added to a gift, or even as a necklace.  Yes, my son wore ALL of his Minecraft designs on a necklace.  He was a hit at school.  Everyone wanted it.  Here is the type of chain I bought.


The next part was to create a hole in the design.  My kids like their perler bead designs to be really melted together.  I mean, not like this. This was the very first one I had ever done and it is rather "pancakesque."  Big fail.  We keep it around just so we can laugh at it every once in awhile.

This part is easier if you don't melt them as much, so there is still somewhat of a hole there.  If not, do what I do.  Get a large paperclip, unravel it, and dig and turn into a corner.  Remember not to go too high up on the design or it will break easier (like my cupcake).  Once your paperclip goes through, you can feed the chain through.


Here are a couple of the ways I have used the ones on the chain:

1) Bag tag for a pencil case

I was looking for a case for both of my son's DSes.  I found these at the Dollarama.  They were perfect, but I knew that the boys would mix them up as they only had one colour.  You know, all hell would break lose around here should something like that happen.  So, to avoid the confusion, I used one of my new handy dandy tags.  Seriously, this worked like a "charm" (see what I did there.  I know.  Impressive).  I also thought these would work really well on pencil cases and backpacks.  I put one on my younger son's bag, but he was really worked up at the way the kid's were eyeing his necklace and he was worried it was going to get stolen.  Worry wart.  It isn't like there isn't one waiting in the wings to replace it.


2) Necklace

I mentioned this one already.  My 7 year old LOVES his Minecraft necklace.  He is the envy of all the other game obsessed little boys on the playground.  I think we may do a PacMan themed one next.  Remember to create the chain fairly long.  You definitely don't want this too tight around your little one's neck.  I also made him remove it or tuck it in if he was on the play structure.

3) Gift Bag

I love this idea too.  It just adds a nice touch.  You can "theme" it too.  This gift happened to be for a gamer.  I can imagine the girl's ones would be a lot of fun too.  What the recipient does with the tag after this point is up to them! Your work is done.


These ideas don't involve the chain.

4) Coasters

These are drink coasters for my boys' bunk buddies, or wherever we happen to need them.  They are from the ever so popular Pokémon.  It's a Pokeball.  Yeah, I'm not sure either.  All I know, is that if you ask a kid, they definitely know what it is.  My boys love these.  I found them neat, because they aren't just random beads melted together in a circle, but something meaningful (at least to the boys).


5) Magnets

My little guy has a big magnet board attached to the back of his desk.  We just used some magnetic strips from the Dollarama that have a sticky side.  I ended up having to glue the sticky side.  Note: Dollarama sticky magnets aren't so sticky.


6) Envelopes

My son had a little girl's birthday party to go to, and I added this to jazz up the card.  I just slapped it on there with some tape. 1 cupcake down, 36 to go.  Grandparents really love these on cards too - a personal touch from the grandkids.


Now that I have uses for these, I don't mind ironing them as much!

What to search for on Pinterest: Minecraft perler bead designs, Minecraft hama bead designs, Pokémon perler bead designs, whatever interests your child
Will I make these again: Yes.  I am forced to.